Linksys RE7350 Setup
An RE7350 extender from Linksys is capable of providing WiFi speeds up to 1800Mbps. You can set it up either with the help of the Push button method or using the graphical interface of the extender which is easily accessible via 192.168.1.1. The default setup mode is Extender mode which can be switched to the Access Point if you want.
How to Set Up Linksys RE7350 via WPS: Extender Mode
If your router has a WPS button, then this method can be used for the Linksys RE7350 setup process. However, you should have enabled the WPS feature on your router for that. Given below are the instructions that must be followed for the WPS setup of the Linksys extender:
- Plug your RE7350 into a wall outlet close to your router.
- Let the LED light on extender’s front blink orange.
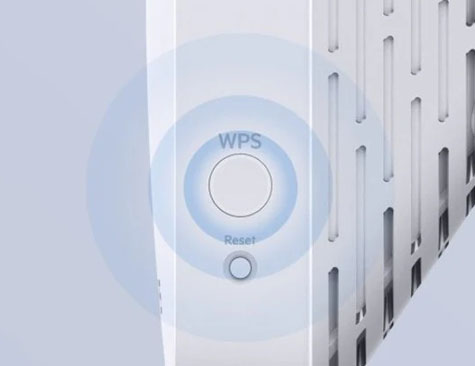
- Now, press the router’s WPS button and within 2 minutes press the WPS button (located on the side) of your Linksys extender.
- The front light will now start blinking blue indicating that the connection is successful.
- In case the light blinks orange, you should follow the step 3 again as the connection has failed.
- To extend the second frequency band, you must follow the step 3 again and let the light on your extender turn solid blue.
- This completes the RE7350 setup in the Extender mode via the WPS method.

Note: The WPS button of your router will not work if you have selected the WEP protocol as the network security type.
Linksys RE7350 Setup Using Graphical Interface: Extender Mode
This method will help you if the router’s WPS button fails to work. Here are the steps that you must follow in order to set up your extender via the graphical interface.
- Plug your RE7350 midway between the main router and the area with no WiFi. There should be at least 2 bars of your router’s WiFi at that location. Move the extender closer to router if that is not the case.
- Let the front light glow orange and switch on your computer.
- Connect the PC to the Linksys Extender Setup – XXX WiFi network. Here, XXX represents the last 3 digits of your RE7350 extender’s MAC address (given on the label).
- Launch setup by accessing the 192.168.1.1 IP address or extender.linksys.com URL.
- Accept the End User License Agreement and choose the network to be extended.
- Input the WiFi password of the chosen network.
- Follow the on-screen instructions to create an admin password, WiFi SSID and network password, and update the firmware of your RE7350 range extender.
In this manner, you can set up your WiFi extender in the Wireless Extender mode. However, if you are interested to set it up as a wired extender i.e. as an access point, you can take the help of the next section.
How to Set Up Linksys RE7350 as Wired Access Point?
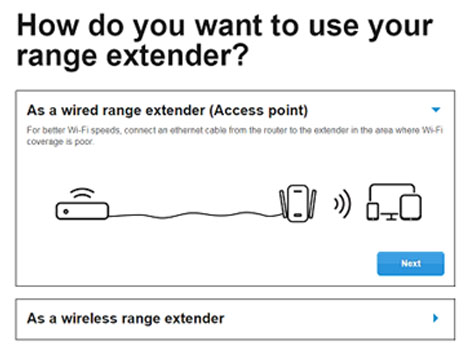
To set up your range extender as an access point, you will need an Ethernet cable long enough to connect its WAN port to the router’s LAN port.
- Start by connecting the WAN and LAN port of your Linksys RE7350 extender and main router respectively.
- Switch on your devices and let the extender’s light status go from blinking blue to orange.
- Connect your PC to the Linksys extender network i.e. Linksys Extender Setup – XXX.
- Go to extender.linksys.com.
- When prompted to choose how you would like to use the extender, select “As a wired range extender (access point)”.
- Go through the on-screen instructions to create SSID and WiFi password for your RE7350 access point.

How to Update RE7350 Firmware?
The Linksys wireless extender firmware needs to be updated regularly if you want it to work well all the time. Give a read to the mentioned steps to upgrade your extender’s firmware:
- Log in to your RE7350 WiFi range extender using the admin password you’ve created during the setup process.
- On the setup wizard, find the Firmware Upgrade option under the Administration menu.
- Click the option.
- This will take you to the Firmware Upgrade page.
- Here, click Check Now.
- The extender will now search for the latest updates available.
- Using the instructions appearing on the screen, install the latest firmware on your RE7350 extender.
Do You Know?
You can also access the extender’s settings if you are connected to your main router. However, you have to use the following URLs:
If you have not changed the extender’s default name: http://RE7350-XXX (Windows) or http://RE7350-XXX.local (iOS).
If you have changed the extender’s default name: http://MyLinksysExtender (Windows) or http://MyLinksysExtender.local (iOS). Here, My Linksys Extender is your extender’s new name and XXX are the last 3 digits of the extender’s MAC address.
How to Perform Linksys RE7350 Factory Reset?
You might need to perform a factory default reset of your Linksys wireless range extender if you are facing connectivity issues using it. The steps are given below:
- Disconnect all the devices connected to your RE7350.
- Locate the Reset button on the side panel and push it using a sharp object.
- Hold the button for a few seconds and let your extender restart.
This will reset the RE7350 extender. Know that all the customized settings like admin password, SSID and network password, Linksys Parental Controls settings, etc. are erased now. Thus, you have to set up the extender once again.
