Linksys RE7000 Setup
The Linksys RE7000 extender is a small networking device, which you can easily install with the help of WPS method. Here, you will see and learn how to connect the device and complete the Linksys RE7000 setup using some instructions.
Linksys RE7000 Extender Setup
There are simple instructions that you can use to setup the Linksys Wireless extender as access point mode or extender mode. Let’s see how to connect the extender to the power and connect with your home network.
Connect It to Power
- Simply plug the extender to the Power outlet.
- Press the power button given on the extender RE7000.
- It will blink Green which means the extender is starting.
Connect to Router via WPS
- It is time to connect the extender to the router without using WPS.
- Press the router WPS button first and within 2 minutes press the WPS button on the extender.
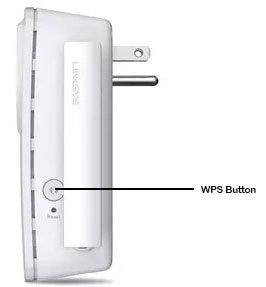
- WPS button light will rings and LED will blink green on the front of the extender.
- If the device turns to solid green the WPS connection established successfully, and if it is blinking means the connection has failed.
Now, it is time to configure the extender with the help of the below given instructions;
Linksys RE7000 Login
After the WPS connection, you must configure it using your computer. Have a look how to connect your computer with the extender network and how to complete Linksys RE7000 setup.
Connect to Extender
- To connect with your extender to the computer or laptop, go in to the computer Wi-Fi Settings.
- Select the Linksys extender setup-XXX or you will see MyWiFi_Ext and you will connect with the network SSID.
Reach Setup Page
- Open the web browser and enter the URL extender.linksys.com or you can use the IP address 192.168.1.1.
- To search, just press the Enter button and you will get to the setup page.
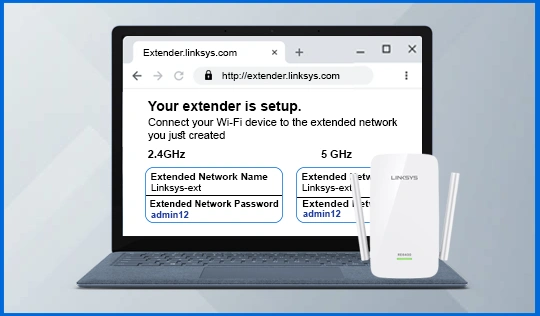
Configure RE7000
- Here, on the Setup page, you have to secure the extender network by entering the new SSID name password and set the credentials for admin interface.
- Choose which mode you want to use as the extender, there are Extender mode and other is access point mode.
- Next choose your wireless network you want to extend and save it as the regular network to extend.
- After setup, just plug the extender on the weak internet signals area and spot finder results.
RE7000 Firmware Update
To update the firmware of the extender, you just have to access the interface on your computer or laptop, and follow some steps;
- Connect compute to the extender network.
- Search URL extender.linksys.com or IP 192.168.1.1 on web browser.
- Go in the Firmware tab and search for new update.
- Find and download latest version and install it in your extender.
- Then, extender will reboot itself to update the firmware.
RE7000 WiFi Password Change
To change the WiFi credentials like SSID username and password, you just have to access the interface first and follow on next steps;
- Access the interface through your computer or laptop.
- Select the Settings> Advanced Settings.
- Select the Wireless> Network tab.
- Enter the new SSID username and password.
- Save the changes by clicking on the Apply button.
Now, have a look at some tips and solutions to the make the Linksys RE7000 setup error free;
Troubleshooting Tips
- Ensure the WPS connection method is established correctly.
- Make sure that the RE7000 setup completes in an updated web browser.
- Restart the device if the interface is not working or URL or IP address is not working.
- Connect your computer to the same new extender network.
- Reset your RE7000 extender if the device is not working.
You can reset the extender by pressing the reset button under the WPS button, just press and hold it for 5 seconds using a sharp object. By releasing it, the reset process will start.